介绍
使用掌控板定制的 mpython ili934 显示 / xpt2046 触摸 TFT 屏幕驱动来驱动 TFT 屏幕,代码逻辑遵循 mpython 的 oled 屏。
驱动源码参考至 https://github.com/jeffmer/micropython-ili9341 。并依照 mpython 掌控板文档 修改了源码,支持调用掌控板自带的字体,也允许使用自定义的字体。
使用说明
接入 TFT 屏幕
掌控板基于 esp32 开发板开发。查询资料显示 esp32 有两个 SPI(串行外设接口),分别如下所示:
HSPI(Hardware SPI)接口:
- MOSI (Master Out Slave In) 默认引脚是GPIO13
- MISO (Master In Slave Out) 默认引脚是GPIO12
- SCK (Serial Clock) 默认引脚是GPIO14
- CS (Chip Select) 默认引脚可以任意选择(通常选择 GPIO15)
VSPI(VSP Interface)接口:
- MOSI 默认引脚是GPIO23
- MISO 默认引脚是GPIO19
- SCK 默认引脚是GPIO18
- CS 默认引脚可以任意选择(通常选择 GPIO5)
因为掌控板重新定义了引脚,请查看官方给出的引脚参考图
这里我们选择VSPI接口连接TFT屏,TFT屏幕引脚与掌控板对应如下:
| TFT屏幕引脚 | 掌控板引脚 |
|---|---|
| VCC | 3V3或VCC |
| GND | GND |
| CS | P16 |
| RESET | P15 |
| DC | P14 |
| SDI(MOSI) | P20(SDA) |
| SCK | P13 |
| LED非必须 | P8(没有使用P7代替或直接接VCC,要传入led=Pin(Pin.P7, Pin.OUT)) |
| SDO(MISO)非必须 | P19(SCL) |
连接好后,下载仓库里面对应的代码文件 ili934xnew.py 为模块,使用下面的代码激活TFT屏幕。
from machine import SPI
from ili934xnew import ILI9341, color565

spi = SPI(2, baudrate=20000000, mosi=Pin(Pin.P20), sck=Pin(Pin.P13))
tft = ILI9341(spi, cs=Pin(Pin.P16), dc=Pin(Pin.P14), rst=Pin(Pin.P15), led=Pin(Pin.P8, Pin.OUT), w=320, h=240, r=0)
# 注:led是用来电亮TFT屏幕的,w是屏幕的宽度,h是屏幕的高度,r是旋转角度,r=1是90度。
如果你想采用其它的引脚来与TFT屏幕交互,你可以在原代码的基础上稍作修改。
显示文字
显示掌控板自带的字库可以使用如下代码:
from machine import SPI
from ili934xnew import ILI9341, color565
spi = SPI(2, baudrate=20000000, mosi=Pin(Pin.P20), sck=Pin(Pin.P13))
tft = ILI9341(spi, cs=Pin(Pin.P16), dc=Pin(Pin.P14), rst=Pin(Pin.P15), led=Pin(Pin.P8, Pin.OUT), w=320, h=240, r=0)
tft.poweron() # 默认不开启屏幕,需要手动打开,如果没有连LED不用这句话
tft.fill(0)
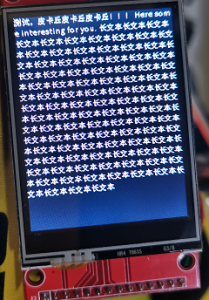
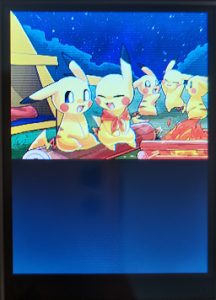
tft.DispChar("测试,皮卡丘皮卡丘皮卡丘!!!\nHere some interesting for you.\n" + "长文本" * 100, 0, 0, color565(255, 255, 255), buffer_char_line=1, buffer_width=None) # buffer_char_line 参数为缓存多少行文字,buffer_width 参数为文字显示区域的宽度,默认为屏幕宽度,会自动换行。
spi.deinit() # 释放总线,不然软重启会白屏
因为掌控板运存比较小,所以对于屏幕比较大的TFT屏幕没有全屏幕缓存区操作,所以此驱动没有 tft.show() 方法。DispChar()方法是逐行刷新。
如果使用了 oled 显示文字,还要显示 tft 屏幕文字,可以用下面的方法刷新 SPI 总线。
tft.refresh()
fill() 与 DispChar() 参考 https://mpython.readthedocs.io/zh/master/library/mPython/mpython.html?mpython.oled.DispChar#rgb。
此模块的所有函数,均模仿官方的oled屏幕集成的函数,不同函数使用会说明。
同时含有也有方法 DispChar_font() ,使用方式同 mpython 的 oled。
绘制图形
由于ILI9341驱动并不是以framebuf为父类,随意绘制图行需要framebuf作为中介。比如我可以这样画一个圆和线:
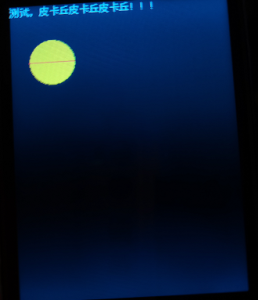
import framebuf
buffer = bytearray(50 * 50 * 2)  # 假设我要绘制 50 * 50 的图形,还要再乘2是因为RGB565每个颜色占两个字节
fbuf = framebuf.FrameBuffer(buffer, 50, 50, framebuf.RGB565)  # 第一个 50 为宽,第二个 50 为高,模式为 rgb565
fbuf.fill_circle(25, 25, 24, color565(255, 255, 0))  # 以点 (25, 25) 为圆心(以framebuf为基准),画一个半径为 24 的黄圆
fbuf.hline(0, 25, 50, color565(255, 0, 0))  # 在 (0, 25) 为点画长为 25 的红线
tft.blit(fbuf, 20, 40, 50, 50, True)  # 把framebuf贴在屏幕 (20, 40) 的位置,最后一个参数表示是否是 rgb565 模式,默认为不是。
绘制图片
绘制图片只支持24位的bmp图片,准备好图片后,采用开源项目的 bmp_file_reader 读取图片,项目文件有微微改动。
import bmp_file_reader as bmpr
from ili934xnew import ILI9341, color565
spi = SPI(2, baudrate=20000000, mosi=Pin(Pin.P20), sck=Pin(Pin.P13))
tft = ILI9341(spi, cs=Pin(Pin.P16), dc=Pin(Pin.P14), rst=Pin(Pin.P15), led=Pin(Pin.P8, Pin.OUT), w=320, h=240, r=0)
tft.poweron()
tft.fill(0)
with open("1.bmp", "rb") as file_handle:
    tft.DispBmp(bmpr.BMPFileReader(file_handle), 0, 0, 5)  # 第二个参数是x坐标,第三个参数是y坐标,第四个参数是缓存的行数,默认一行一行刷新。
触摸
使用触摸时,因为掌控板接口不足,使用我们要舍弃 LED 接口,这意味着不能使用 tft.power() 方法开启或关闭显示屏,所以您可以将LED引脚的线直接接到VCC接口上,当然
安装如下方式连线:
| TFT屏幕触摸引脚 | 掌控板引脚 |
|---|---|
| T_CLK | P0 |
| T_CS | P9(或P11) |
| T_DIN | P8(或P6) |
| T_DO | P1 |
| T_IRQ | P2 |
下载仓库中的 xpt2046.py 并写如下代码(连 P9 和 P8):
from machine import SPI

from ili934xnew import ILI9341, color565
from xpt2046 import Touch

def touchscreen_press(x, y):
    print(x-5,y+10)  # 这样才有不错的效果

spi1 = SPI(1, baudrate=20000000, mosi=Pin(Pin.P20), sck=Pin(Pin.P13))
tft = ILI9341(spi1, cs=Pin(Pin.P16), dc=Pin(Pin.P14), rst=Pin(Pin.P15), led=None, w=320, h=240, r=0)
tft.fill(0)
tft.DispChar("测试,皮卡丘皮卡丘皮卡丘!!!", 0, 0, 63488)
spi2 = SPI(2, baudrate=1000000, sck=Pin(Pin.P0), mosi=Pin(Pin.P8), miso=Pin(Pin.P1))
tft_touch = Touch(spi2, cs=Pin(Pin.P9), int_pin=Pin(Pin.P2), int_handler=touchscreen_press, r=0)
掌中宝的代码参考,连接 P11 与 P6:
spi = SPI(2, baudrate=1000000, sck=Pin(Pin.P0), mosi=Pin(Pin.P6), miso=Pin(Pin.P1))
tft_touch = Touch(spi, cs=Pin(Pin.P11), int_pin=Pin(Pin.P2), int_handler=touchscreen_press, r=0)
注意:输出的xy坐标不会完全和显示坐标同一,需要手动在touchscreen_press()处理与调整。
触摸参考:https://github.com/rdagger/micropython-ili9341/blob/master/xpt2046.py,项目文件有微微改动。